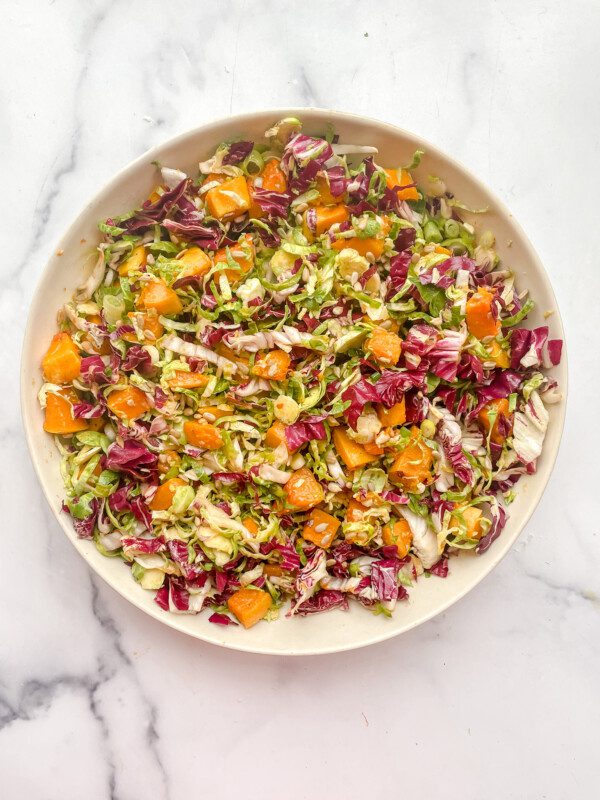
Tag: gluten free

Cold-Oven Pound Cake (Healthier + One-Bowl!) (Gluten Free, Dairy Free Optional)

Cold-Oven Pound Cake (Healthier + One-Bowl!) (Gluten Free, Dairy Free Optional)

A healthier take on a classic pound cake. I thought it couldn’t be done, but here she is! Perfect for any time of year, but particularly a make-ahead dessert for summer parties that will satisfy adults and kids alike.

Italian Cucumber and Tomato Salad (Gluten Free, Vegan)

Italian Cucumber and Tomato Salad (Gluten Free, Vegan)

When the temperatures rise and you’re in need of a refreshing dish, this salad is the answer to all your culinary prayers. Plus, with just 5 minutes of prep time, it’s a breeze to put together. Trust me, once you try it, you’ll be questioning how something so simple can taste this good.

The Ultimate Healthy 7-Layer Dip (Gluten-free, Vegetarian-optional)

The Ultimate Healthy 7-Layer Dip (Gluten-free, Vegetarian-optional)

This dip will make you the talk of the neighborhood. Perfect for barbecues, potlucks, or casual get-togethers, this healthy take on a classic 7-layer Mexican dip is sure to impress your friends and family with its lightness, freshness, and explosion of flavors.

While everyone adores the traditional 7-layer dip, not everyone appreciates the high fat content in the store bought versions. This recipe retains all the deliciousness while offering a healthier alternative, and the secret all lies in building flavors with each layer. So much so that each layer is tasty enough to devour on its own!

If you prefer a vegetarian option, this recipe has got you covered – simply use vegetarian refried beans, and you’ll have a delectable dip suitable for all! And for those looking to go dairy-free, you can easily omit the cheese and replace the yogurt with a plain non-dairy yogurt that will provide the same creamy goodness.

This recipe is really open to customization which ensures you can create a dip that perfectly suits your taste preferences. I have listed a few of my favorite swaps below, but no matter what, this healthy take on the classic 7-layer dip will tantalize your tastebuds and elevate any summer gathering.

Watch Me Make My Ultimate Healthy 7-Layer Dip

If you’re in need of some more crowd-pleasing appetizers, be sure to follow me on Facebook, or see all of my favorites (and so many other delicious recipes!) over on Pinterest.

How To Make My Ultimate Healthy 7-Layer Dip

Step 1. In a small saucepan over medium-low heat, warm the refried beans with the cumin, chiles, ¼ teaspoon of salt and ⅛ teaspoon of pepper.  Mix together in the pan, and when warm to the touch, remove from the heat and then let cool while you proceed.

Step 2. In a medium bowl, whisk together the yogurt and packet of taco seasoning.

Step 3. In a separate small bowl, mash avocados with the ¼ cup cilantro, lime juice and a pinch of salt and pepper to taste.

Step 4. Spread cooled refried beans all over the bottom of a shallow serving dish or pie plate.

Step 5. Top with the shredded cheese, then yogurt, then avocado mash.

Step 6. Finally, add the diced grape tomatoes, green onion, and additional cilantro.

Step 7. Serve with tortilla chips right away or cover and refrigerate until ready to serve.

Step 8. Enjoy!

What Else Can I Use?

  • If you want to make this vegetarian, simply use vegetarian refried beans.
  • To make this dairy-free, omit the cheese and use a plain non-dairy yogurt.
  • No refried beans?  Mash up some black beans or pinto beans instead using the same method as described in the recipe.
  • I like the soft crunch and pop of the fresh tomatoes, but salsa is delicious in its place.  
  • You can leave out the canned chiles and use sliced jalapeno instead.

This Ultimate Healthy 7-Layer Dip is special because:

It’s a healthier twist on a classic summer staple
It’s light and flavorful
It only takes 15 minutes to prepare!

More Summer Must-Haves

Berry Caprese Salad

My Secret Sauce-Stuffed Meatballs

The Best Chunky Guacamole (Gluten Free, Vegetarian)

Raspberry Picnic Pie Bars

If you make my Ultimate Healthy 7-Layer Dip, and I hope you do, please leave me a comment here and rate the recipe. Your feedback means a lot to me! You can also post to Instagram and tag me so I can share your creations!

Leave a Reply

Your email address will not be published. Required fields are marked *

Recipe Rating


If you like full recipe videos, you’ll want to follow me on Facebook and Youtube as I publish new videos daily!

The Ultimate Healthy 7-Layer Dip (Gluten-free, Vegetarian optional)

Kat Ashmore
This crowd-pleasing dip will make you the talk of the neighborhood – perfect for any and all summer barbecues and gatherings!
5 from 2 votes
Prep Time 15 minutes
Course Appetizer, Sides, Snacks
Cuisine Mexican
Servings 10
Calories 123 kcal

Ingredients
  

  • 1 15-ounce can fat free refried beans Use vegetarian refried beans if you are vegetarian
  • ½ teaspoon ground cumin
  • 1 4-ounce can green chiles
  • Kosher salt
  • Fresh cracked black pepper
  • 2 cups plain yogurt
  • 1 1-ounce packet of low-sodium taco seasoning
  • 2 medium avocados
  • ¼ cup cilantro chopped
  • Juice from 1 lime

Finishing layers:

  • ½ cup cheddar cheese shredded
  • 1 ½ cups grape tomatoes quartered
  • ¼ cup green onion white and green parts sliced
  • ¼ cup cilantro chopped

Instructions
 

  • In a small saucepan over medium-low heat, warm the refried beans with the cumin, chiles, ¼ teaspoon of salt and ⅛ teaspoon of pepper. Mix together in the pan, and when warm to the touch, remove from the heat and then let cool while you proceed.
  • In a medium bowl, whisk together the yogurt and packet of taco seasoning.
  • In a separate small bowl, mash avocados with the ¼ cup cilantro, lime juice and a pinch of salt and pepper to taste.
  • Spread cooled refried beans all over the bottom of a shallow serving dish or pie plate.
  • Top with the shredded cheese, then yogurt, then avocado mash.
  • Finally, add the diced grape tomatoes, green onion, and additional cilantro.
  • Serve with tortilla chips right away or cover and refrigerate until ready to serve.
  • This dip is best enjoyed the day it is made.

Nutrition

Calories: 123kcalCarbohydrates: 7gProtein: 4gFat: 9gSaturated Fat: 3gPolyunsaturated Fat: 1gMonounsaturated Fat: 5gCholesterol: 12mgSodium: 73mgPotassium: 341mgFiber: 3gSugar: 3gVitamin A: 440IUVitamin C: 8mgCalcium: 110mgIron: 0.4mg
Keyword avocado, dip, dips, Mexican
Tried this recipe?Let us know how it was!
Kimchi Tuna Salad (Gluten Free, Dairy Free)

Kimchi Tuna Salad (Gluten Free, Dairy Free)

I love a good twist on a classic, and for good reason – sometimes, although a recipe is well loved, it’s time to spice things up a bit. Well, my Kimchi Tuna Salad has just entered the chat.

Easy Cinnamon Baked Pears (Gluten Free, Dairy Free)

Easy Cinnamon Baked Pears (Gluten Free, Dairy Free)

Whether you have perfectly ripe pears begging to be used or simply have a craving for a healthy, easy dessert you can make ahead of time, this recipe is the answer. 

Vegetarian Chopped Antipasto Salad

Vegetarian Chopped Antipasto Salad

Antipasto, meaning ‘before the meal’, is the traditional first course of an Italian feast. Around here though, we believe that a salad can be an entire meal in a bowl that actually fills you up. This Vegetarian Chopped Antipasto Salad, our Hungry Lady Salad Episode 37 is no exception.

For those of you who believe that an Antipasto (or Charcuterie) board is elite, minus the meat, this chopped salad is packed with those same bold flavors and bright colors. I will be making it all Spring and Summer long.

Whether you’re meal prepping for the week or serving straight away, it’s a fantastic salad for lunches – you could even add some chickpeas for additional protein. And I will most certainly be adding this to dinners, pairing it with my Healthy Baked Parmesan, or even my Portobello Mushroom Pizzas. There is so much to look forward to in every bite, and because it’s chopped, you really will get a little bit of everything. It’s just the way I like it.

Watch Me Make My Vegetarian Chopped Antipasto Salad

If you’re in need of some more hungry lady salads, be sure to follow me on Facebook, or see all of my favorites (and so many other delicious recipes!) over on Pinterest.

How To Make My Vegetarian Chopped Antipasto Salad

Step 1. With a whisk, mix together the garlic, oregano, pinch of salt, mustard, vinegar, and olive oil in a large serving bowl.

Step 2. Drain the artichoke hearts in a colander, then cut them into quarters.  Using a clean kitchen towel, pat the artichoke hearts dry very well.  Reserve.

Step 3. To the bowl of dressing, add the radicchio and romaine lettuce.  

Step 4. Top with the pepperoncini, tomatoes, onion, artichoke hearts, mozzarella and olives.  

Step 5. Season with a pinch of salt and the black pepper. 

Step 6. Toss to fully combine and ensure the salad is evenly coated in the dressing. Serve right away.

Step 7. Enjoy!

What Else Can I Use?

  • No radicchio?  Use chopped fennel or swiss chard instead.
  • If you have iceberg on hand, you can use that instead of romaine.
  • Leave out the mozzarella cheese to make this dairy free.
  • Shaved parmesan can be used in place of the mozzarella if you prefer it.
  • White wine vinegar can be used in place of red wine vinegar.
  • Dried basil can be used in place of oregano if that’s what you have.

This Vegetarian Chopped Antipasto Salad is special because:

You’ll get all of the bold, delicious flavor in every single bite

You can make it ahead of time and keep for up to 5 days, just keep the dressing separate!

More Chopped Hungry Lady Salads

Celery Chopped Salad with Apricots, Gorgonzola and Pecans (Vegetarian, Gluten Free)

Crunchy Kale Chopped Salad with 3-Ingredient Hummus Dressing (Vegetarian, Gluten Free)

The Famous La Scala Chopped Salad

Mediterranean Chopped Salad with Roasted Red Pepper Dressing (Vegetarian, Gluten-Free)

Lentil Chopped Salad with Honey Walnut Dressing (Vegetarian, Gluten-Free)

If you make my Vegetarian Chopped Antipasto Salad, and I hope you do, please leave me a comment here and rate the recipe. Your feedback means a lot to me! You can also post to Instagram and tag me so I can share your creations!

Leave a Reply

Your email address will not be published. Required fields are marked *

Recipe Rating


If you like full recipe videos, you’ll want to follow me on Facebook and Youtube as I publish new videos daily!

Vegetarian Chopped Antipasto Salad (Gluten-free, Vegetarian)

Kat Ashmore
For those of you who believe that an Antipasto board is elite, this chopped salad is packed with those same bold flavors and bright colors, and I will be making it all Spring and Summer long. 
5 from 2 votes
Prep Time 15 minutes
Total Time 15 minutes
Course Salad, Salad Dressing
Cuisine Italian
Servings 6
Calories 250 kcal

Ingredients
  

  • 1 large garlic clove peeled and finely grated
  • ½ tsp. crushed dried oregano
  • Kosher salt
  • 2 teaspoons Dijon mustard
  • cup extra-virgin olive oil
  • ¼ cup red wine vinegar
  • 1 14- oz. can artichoke hearts packed in water
  • 1 small head radicchio coarsely chopped
  • 3 hearts of romaine coarsely chopped (4-5 cups)
  • 8-10 pepperoncini thinly sliced into rounds
  • 1 cup grape or cherry tomatoes quartered
  • 1 small red onion minced
  • ¼ cup pitted green olives quartered
  • 2 ounces fresh mozzarella cheese cut in a small dice (about 1 cup)
  • teaspoon fresh cracked black pepper

Instructions
 

  • With a whisk, mix together the garlic, oregano, pinch of salt, mustard, vinegar, and olive oil in a large serving bowl. Note: if you are making this salad ahead of time to eat through the week, store the dressing separately from the salad and dress each time you serve it.
  • Drain the artichoke hearts in a colander, then cut them into quarters. Using a clean kitchen towel, pat the artichoke hearts dry very well. Reserve.
  • To the bowl of dressing, add the radicchio and romaine lettuce.
  • Top with the pepperoncini, tomatoes, onion, artichoke hearts, mozzarella and olives.
  • Season with a pinch of salt and the black pepper.
  • Toss to fully combine and ensure the salad is evenly coated in the dressing.
  • Serve right away.

Nutrition

Calories: 250kcalCarbohydrates: 10gProtein: 4gFat: 22gSaturated Fat: 4gPolyunsaturated Fat: 2gMonounsaturated Fat: 10gCholesterol: 7mgSodium: 446mgPotassium: 279mgFiber: 4gSugar: 3gVitamin A: 5892IUVitamin C: 35mgCalcium: 102mgIron: 2mg
Keyword Antipasto, Hungry Lady Salads, salad, salad dressing
Tried this recipe?Let us know how it was!
Super Moist Glazed Lemon Yogurt Cake (Gluten-Free)

Super Moist Glazed Lemon Yogurt Cake (Gluten-Free)

My Glazed Lemon Yogurt Cake may be the perfect spring cake – it’s wonderful for for brunch or dessert, and it’s so easy to make that I often get the kids involved.

Lemon Coconut Macaroons (Gluten Free, Dairy Free)

Lemon Coconut Macaroons (Gluten Free, Dairy Free)

This recipe might just be the perfect bite of Spring you’ve been looking for! My Lemon Coconut Macaroons started with my nana: she made wonderful macaroons and had a love for coconut that I share, so I couldn’t help but create these melt-in-your-mouth cookies in her honor.

Quinoa Glow Salad (Gluten-Free, Vegetarian)

Quinoa Glow Salad (Gluten-Free, Vegetarian)

This salad is sure to make you glow from the inside out! It’s not only packed with bright Spring flavors and crisp textures, but it also contains ingredients that are full of a whole host of skin-supporting nutrients.

Carrots, turmeric, quinoa, pears, and lemon are all powerhouse ingredients when it comes to gut and skin health. Carrots are high in vitamin A which helps to repair skin tissue, turmeric has anti-inflammatory properties that can reduce inflammation in the body, and quinoa is a great source of plant-based protein and contains all nine essential amino acids. Pears are rich in antioxidants and vitamin C, which can help protect your skin from damage caused by free radicals and lemon is high in vitamin C and helps to detoxify your body and promote healthy digestion.

With every bite, I really am trying to help you cover all bases…

And for some of you who may be saying “But cheese doesn’t make you glow!” Cheese makes me happy, and being happy makes you glow, and that’s all I’ll say on that subject!

Watch Me Make My Quinoa Glow Salad

If you’re in need of some more meal in a bowl salads, be sure to follow me on Facebook, or see all of my favorites (and so many other delicious recipes!) over on Pinterest.

How To Make My Quinoa Glow Salad

Step 1. Preheat the oven to 400 Degrees F.

Step 2. In a large serving bowl, whisk together the dressing ingredients.  You will use this bowl to toss your salad so set that aside.

Step 3. On a large baking sheet, toss carrots, olive oil, ½ teaspoon of salt, pepper and shallots.  

Step 4. Roast for about 30 minutes until browned and tender, shaking the pan around halfway through.

Step 5. Meanwhile, bring a medium saucepan filled with generously salted water to a boil.  Add the quinoa and cook it like pasta, simmering until just tender according to package directions.  Drain and return the quinoa to the pan.  Cover the top with a paper towel, then the lid and set aside.

Step 6. Into your serving bowl of dressing, shave the cabbage using a mandoline right into the bowl.  If you don’t have a mandoline, slice very thin with a knife and add it to the bowl.  

Step 7. Top with the roasted carrots and shallot, quinoa, pear, goat cheese, and parsley.  

Step 8. Toss to fully coat the salad with the dressing, finish with a sprinkle of flaky salt and serve.

Step 9. Enjoy!

What Else Can I Use?

This Quinoa Glow Salad is special because:

It’s packed full of texture, flavor and skin-supporting ingredients

Every bite is incredibly satisfying

It’s a fantastic meal-prep salad as it keeps all week in the fridge

Even More Spring Salads

Shaved Brussels Sprouts and Butternut Squash Salad (Vegetarian)

Celery Chopped Salad with Apricots, Gorgonzla and Pecans

Berry Caprese Salad

If you make my Quinoa Glow Salad, and I hope you do, please leave me a comment here and rate the recipe. Your feedback means a lot to me! You can also post to Instagram and tag me so I can share your creations!

Leave a Reply

Your email address will not be published. Required fields are marked *

Recipe Rating


If you like full recipe videos, you’ll want to follow me on Facebook and Youtube as I publish new videos daily!

Quinoa Glow Salad (Gluten-free, Vegetarian)

Kat Ashmore
This salad is not only packed with bright Spring flavors and crisp textures, but it also contains ingredients that are full of a whole host of skin-supporting nutrients.
5 from 4 votes
Prep Time 10 minutes
Cook Time 30 minutes
Total Time 40 minutes
Course Lunch, Salad, Salad Dressing
Cuisine American
Servings 8 People
Calories 233 kcal

Equipment

  • 1 Mandoline (Optional)

Ingredients
  

Lemon-Turmeric Dressing:

  • 3 tablespoons Lemon Juice from one juicy lemon
  • cup Extra-Virgin Olive Oil
  • ½ teaspoon Dijon Mustard
  • 1 teaspoon Maple Syrup
  • ½ teaspoon Ground Turmeric
  • ¼ teaspoon Kosher salt
  • Black Pepper

Salad:

  • Kosher salt
  • teaspoon Fresh Cracked Black Pepper
  • 1 cup Dried Quinoa rinsed
  • ½ Medium Red Cabbage cut lengthwise into 4 pieces
  • 2 Large Carrots peeled, halved, and sliced into 2 inch pieces
  • 2 Large Shallots peeled and sliced thin
  • 1 Bartlett Pear cored and diced small
  • 3 ounces Goat Cheese crumbled
  • ½ cup Fresh Parsley chopped
  • Flaky sea salt such as Maldon (for finishing, optional)

Instructions
 

  • Preheat the oven to 400 Degrees F.
  • In a large serving bowl, whisk together the dressing ingredients. You will use this bowl to toss your salad so set that aside.
  • On a large baking sheet, toss carrots, olive oil, ½ teaspoon of salt, pepper and shallots.
  • Roast for about 30 minutes until browned and tender, shaking the pan around halfway through..
  • Meanwhile, bring a medium saucepan filled with generously salted water to a boil. Add the quinoa and cook it like pasta, simmering until just tender according to package directions. Drain and return the quinoa to the pan. Cover the top with a paper towel, then the lid and set aside.
  • Into your serving bowl of dressing, shave the cabbage using a mandoline right into the bowl. If you don’t have a mandoline, slice very thin with a knife and add it to the bowl.
  • Top with the roasted carrots and shallot, quinoa, pear, goat cheese, and parsley.
  • Toss to fully coat the salad with the dressing, finish with a sprinkle of flaky salt and serve.
  • This salad will keep in the fridge for up to 5 days.

Nutrition

Calories: 233kcalCarbohydrates: 25gProtein: 6gFat: 13gSaturated Fat: 3gPolyunsaturated Fat: 2gMonounsaturated Fat: 7gCholesterol: 5mgSodium: 144mgPotassium: 375mgFiber: 4gSugar: 6gVitamin A: 3569IUVitamin C: 39mgCalcium: 65mgIron: 2mg
Keyword Hungry Lady Salads, lemon, quinoa, spring salad, turmeric
Tried this recipe?Let us know how it was!
Maple-Rye Banana Bread (Refined Sugar Free, Gluten and Dairy-Free Optional)

Maple-Rye Banana Bread (Refined Sugar Free, Gluten and Dairy-Free Optional)

My Nana made THE BEST banana bread and to this day it’s a recipe I turn to for comfort – it somehow manages to recreate that warm nana-hug feeling and I just can’t get enough. This Maple-Rye take on Nana’s banana bread is a healthy twist that’s made in a single bowl with very little effort required

Shaved Brussels Sprouts and Butternut Squash Salad with Paprika Honey Mustard Dressing (Vegetarian, Gluten Free)

Shaved Brussels Sprouts and Butternut Squash Salad with Paprika Honey Mustard Dressing (Vegetarian, Gluten Free)

Even my Brussels sprouts skeptics will fall in love with this stunning blend of flavors, and the Brussels sprouts will continue to tenderize as it sits. If raw Brussels sprouts in particular aren’t to your taste, you can even make it a few hours in advance to soften them up before eating.

Slow Cooker Braised Pork with Parsley-Vinegar Sauce (Keto, Paleo, Gluten-Free)

Slow Cooker Braised Pork with Parsley-Vinegar Sauce (Keto, Paleo, Gluten-Free)

If I’m using my slow cooker to cook dinner, it’s probably this one.

Brace yourself because this may be a controversial opinion, but I’m not a big fan of the pulled pork tossed in syrupy sweet barbecue sauce. I am a big fan, however, of it topped with a bright, acidic sauce like this one. 

This Slow Cooker Braised Pork with Parsley-Vinegar Sauce is quite possibly my favorite way to eat a big, affordable cut of meat like a pork butt or shoulder.  Not only is it incredibly simple to make, it is a total crowd pleaser and leftovers are great on sandwiches or in rice bowls all week long.

Slow cookers are definitely convenient (there’s no doubt about that!) but a lot of foods simply don’t benefit from this cooking method in my opinion. However, by searing the pork before putting it in the slow cooker, you get both a caramelized, burnished crust and fork tender meat at the same time. And the addition of parsley, garlic, and vinegar keep the dish from feeling too heavy and wake up all of the pork’s flavors. It’s a total win.

How To Make My Slow Cooker Braised Pork with Parsley-Vinegar Sauce

Step 1. Trim the pork butt of any excess fat you wish to remove.  Generously salt and pepper the pork on all sides. 

Step 2. Heat a large, heavy-bottomed saute pan over medium-high heat and add the oil.

Step 3. Using tongs to rotate the meat, sear the pork on all sides for 5-7 minutes until a deep brown crust forms.  Remove from the heat.

Step 4. To a large slow cooker, add the stock and worcestershire and whisk together.

Step 5. Add the pork in and spoon the onions and garlic over and around the pork.

Step 6. Cook on low for about 8 hours, or until the pork shreds easily with a fork.  It should be fall-apart tender when you lift it up.

Step 7. While the pork is cooking, make the parsley-vinegar sauce by combining all of the ingredients in a small bowl.  Stir to combine and season with salt and pepper to taste.  Set aside, covered, until ready to serve.  

Step 8. When the pork is cooked, transfer to a wooden cutting board.  Shred it up with two forks, removing any extra fat you want to get rid of and discarding that.  Spoon the slow cooked onions and garlic over the top of the pork evenly.

Step 9. Plate the hunks of pork on serving dishes, spoon the parsley-vinegar sauce over top, and serve. 

Step 10. Enjoy!

What Else Can I Use?

  • Pork shoulder, simply a cut of meat from a different part of the pig’s shoulder, can be used in place of the pork butt.
  • You can use boneless pork butt as well, simply check the pork a couple of hours earlier than the suggested 8 hour mark.
  • Many vinegars can be used in the sauce, including apple cider, sherry, and white wine.
  • If you don’t have thyme, use some oregano instead and you will basically have the classic Argentinian chimichurri sauce.

This Slow Cooker Braised Pork with Parsley-Vinegar Sauce is special because:

It’s a great way to enjoy a cheaper cut of meat

It’s a low-maintenance meal – just set it and forget it!

The parsley, garlic, and vinegar sauce keep the dish from feeling too heavy and wake up all of the pork’s flavors. It’s mouthwatering!

Slow Cooker Staples

Slow Cooker Bahn Mi Bowls

Apple Pie Oatmeal (Vegan, Gluten-Free)

Slow-Cooker Banana Bread Oatmeal (Vegan, Gluten-Free)

If you make my Slow Cooker Braised Pork with Parsley-Vinegar Sauce, and I hope you do, please leave me a comment here and rate the recipe. Your feedback means a lot to me! You can also post to Instagram and tag me so I can share your creations!

If you like full recipe videos, you’ll want to follow me on Facebook and Youtube as I publish new videos daily!

Slow-Cooker Braised Pork with Parsley Vinegar Sauce

Kat Ashmore
This Slow-Cooker Braised Pork with Parsley Vinegar Sauce is quite possibly my favorite way to eat a big, affordable cut of meat.
No ratings yet
Prep Time 20 minutes
Cook Time 8 hours
Total Time 8 hours 20 minutes
Course Dinner, Main Course
Cuisine American
Servings 8 People
Calories 129 kcal

Ingredients
  

  • 1 6 pound pork butt, bone-in
  • Kosher salt
  • Fresh cracked black pepper
  • 2 tablespoons neutral oil
  • 1 cup chicken stock low-sodium or homemade
  • 1 tablespoon Worcestershire sauce
  • 1 medium yellow onion sliced thin
  • 6 garlic cloves peeled and smashed

Parsley Vinegar Sauce:

  • cup extra-virgin olive oil
  • 2 tablespoons red wine vinegar
  • ½ cup fresh parsley
  • 2 teaspoons fresh thyme leaves chopped
  • Flaky salt
  • Fresh cracked black pepper

Instructions
 

  • Set the pork butt out on the counter an hour before you plan to cook, if possible. This will help the crust sear well (but don’t stress if you’re pressed for time, there is enough fat on there to get caramelization either way).
  • Trim the pork butt of any excess fat you wish to remove. Generously salt and pepper the pork on all sides. I use about 1 tablespoon of salt and 1 teaspoon of pepper.
  • Heat a large, heavy-bottomed saute pan over medium-high heat and add the oil.
  • Using tongs to rotate the meat, sear the pork on all sides for 5-7 minutes until a deep brown crust forms. Remove from the heat.
  • To a large slow cooker, add the stock and worcestershire and whisk together.
  • Add the pork in and spoon the onions and garlic over and around the pork.
  • Cook on low for about 8 hours, or until the pork shreds easily with a fork. It should be fall-apart tender when you lift it up.
  • While the pork is cooking, make the parsley-vinegar sauce by combining all of the ingredients in a small bowl. Stir to combine and season with salt and pepper to taste. Set aside, covered, until ready to serve.
  • When the pork is cooked, transfer to a wooden cutting board. Shred it up with two forks, removing any extra fat you want to get rid of and discarding that. Spoon the slow cooked onions and garlic over the top of the pork evenly.
  • Plate the hunks of pork on serving dishes, spoon the parsley-vinegar sauce over top, and serve. I like to serve this with a simple roasted green vegetable or salad and roasted potato wedges.

Nutrition

Calories: 129kcalCarbohydrates: 4gProtein: 12gFat: 7gSaturated Fat: 2gPolyunsaturated Fat: 1gMonounsaturated Fat: 4gTrans Fat: 0.04gCholesterol: 35mgSodium: 110mgPotassium: 294mgFiber: 0.5gSugar: 1gVitamin A: 343IUVitamin C: 8mgCalcium: 26mgIron: 1mg
Keyword braised pork, pork, slow cooked
Tried this recipe?Let us know how it was!
Celery Chopped Salad with Apricots, Gorgonzola, and Pecans (Gluten-Free, Vegetarian)

Celery Chopped Salad with Apricots, Gorgonzola, and Pecans (Gluten-Free, Vegetarian)

This Celery Chopped Salad with Apricots, Gorgonzola and Pecan salad boasts a tartness and freshness that is second to none. Then add in the sweetness of the apricots and this salad is guaranteed to be your new go-to.

Caramelized Cabbage Salad with Fennel, Chickpeas and Yogurt Tahini Dressing

Caramelized Cabbage Salad with Fennel, Chickpeas and Yogurt Tahini Dressing

This Caramelized Cabbage Salad with Fennel, Chickpeas and Yogurt Tahini Dressing is one of my new favorite ways to enjoy cabbage. It’s a truly versatile dish that can be served as a side or main course…

Celery Chopped Salad with Dates, Feta and Nuts (Vegetarian, Gluten-Free)

Celery Chopped Salad with Dates, Feta and Nuts (Vegetarian, Gluten-Free)

The very first Hungry Lady Salad of 2023! This will make you rethink celery.
I’ve been making variations of this salad for years, usually when I don’t have salad greens on hand but crave that fresh, bright flavor that only a salad can bring. And before you question the usability of the celery you forgot in the back of your refrigerator, I have a hack for you! If your celery is a little wilted, simply place it in a bowl of ice water to heighten the crispiness, then drain on a tea towel before continuing. You can thank me later.

Watch Me Make My Celery Chopped Salad with Dates, Feta and Nuts

If you’re in need of some more healthy and delicious salads, be sure to follow me on Facebook, or see my full Hungry Lady Salad series (and so many other delicious recipes!) over on Pinterest.

How To Make My Celery Chopped Salad with Dates, Feta and Nuts

Step 1. Seperate the celery stalks and leaves. Slice the stalks thinly on a bias and roughly chop the leaves.  

Step 2. To toast the nuts, warm them in a medium skillet over medium heat, stirring often, until fragrant and toasted, about 2-4 minutes. 

Step 3. Place sliced celery stalks and leaves in a medium sized bowl.  

Step 4. Add the chopped nuts, dates, feta cheese, lemon juice, white wine vinegar, olive oil, and red pepper flakes. Season generously with salt and pepper, and toss to combine. 

Step 5. Enjoy!

What Else Can I Use?

  • Queso fresco is a great substitute for feta, as is parmesan
  • Pecans or walnuts are my preference here, almonds are good too.
  • If you’re nut-free, try using toasted sunflower seeds
  • With the meaty dates, cheese, and nuts I find this a satisfying light lunch on its own, though you could throw in some leftover rotisserie chicken as well.

This Celery Chopped Salad with Dates, Feta and Nuts is special because:

It’s fast, easy and incredibly filling

It’s gluten-free and vegetarian

You can make the salad ahead of time – just leave the nuts off until you’re ready to serve to preserve their crunch!

It’s a great way to use up celery, or improvise when you don’t have traditional salad greens on hand.

Chopped Hungry Lady Salads

Crunchy Kale Chopped Salad with 3-Ingredient Hummus Dressing (Vegetarian, Gluten Free)

The Famous La Scala Chopped Salad

Mediterranean Chopped Salad with Roasted Red Pepper Dressing (Vegetarian, Gluten-Free)

Lentil Chopped Salad with Honey Walnut Dressing (Vegetarian, Gluten-Free)

Tuscan Kale Chopped Salad with Lemon Tahini Dressing (Vegetarian, Gluten-Free)

If you make my Celery Chopped Salad with Dates Feta and Nuts, and I hope you do, please leave me a comment here and rate the recipe. Your feedback means a lot to me! You can also post to Instagram and tag me so I can share your creations!

Leave a Reply

Your email address will not be published. Required fields are marked *

Recipe Rating


If you like full recipe videos, you’ll want to follow me on Facebook and Youtube as I publish new videos daily!

Celery Chopped Salad with Dates, Feta and Nuts (Vegetarian, Gluten-Free)

A Hungry Lady Salad that will have you rethinking Celery.
5 from 22 votes
Prep Time 10 minutes
Total Time 10 minutes
Course Lunch, Salad
Servings 6
Calories 247 kcal

Ingredients
  

  • 10 Stalks of Celery
  • ½ cup Walnuts or Pecans coarsely chopped
  • 6 Medjool Dates pitted and roughly chopped
  • ½ cup Feta Cheese crumbled
  • 1 Shallot sliced thin
  • Juice from 1 Lemon
  • 1 Tablespoon White Wine Vinegar
  • ¼ cup Extra-Virgin Olive Oil
  • teaspoon Red Pepper Flakes
  • Kosher Salt
  • Fresh Cracked Black Pepper

Instructions
 

  • Separate the leaves from the stalks of the celery. Slice the stalks thinly on a bias and roughly chop the leaves.
  • If your celery is a little wilted, place it in a bowl of ice water to heighten the crispiness, then drain on a tea towel before continuing.
  • To toast the nuts, warm them in a medium skillet over medium heat, stirring often, until fragrant and toasted, about 2-4 minutes. 
  • Note: If you are making this salad ahead, store the nuts separately and mix in just before serving to maintain their crunch.
  • Place sliced celery stalks and leaves in a medium sized bowl.
  • Add the chopped nuts, dates, feta cheese, lemon juice, white wine vinegar, olive oil, and red pepper flakes. Season generously with salt and pepper, and toss to combine.
  • Serve.

Nutrition

Calories: 247kcalCarbohydrates: 21gProtein: 4gFat: 18gSaturated Fat: 4gPolyunsaturated Fat: 6gMonounsaturated Fat: 8gCholesterol: 11mgSodium: 150mgPotassium: 251mgFiber: 3gSugar: 17gVitamin A: 133IUVitamin C: 1mgCalcium: 91mgIron: 1mg
Keyword Celery, chopped salad, Hungry Lady Salads, lunch salads
Tried this recipe?Let us know how it was!
Most Popular Recipes of 2022

Most Popular Recipes of 2022

This year we made food the way it was meant to be made – delicious, filling and packed with flavour! In 2022, we tried new flavor combinations, different ways to prepare old classics and found some new favorites along the way.

Chili Caramel Brussels Sprouts (Gluten-Free, Dairy-Free, Refined Sugar Free)

Chili Caramel Brussels Sprouts (Gluten-Free, Dairy-Free, Refined Sugar Free)

My Chili Caramel Brussels Sprouts are an adventure in flavor, featuring a stunning umami glaze and picture perfect caramelization that makes me want to stand over the stovetop and finish them all by myself.

Thanksgiving Essential Recipes

Thanksgiving Essential Recipes

Thanksgiving. It’s a time to gather with family and friends, have a few laughs, some fun conversation and enjoy delicious food. But it can be a bit of chore to cook for a horde of family and friends, no matter how much you love them. This year however, I made it my mission to gather some recipes for you that were not only quick and easy but on the healthy side as well. These Thanksgiving essential recipes are some of my tried and true – the ones I turn to year after year that never fail to delight! Shall we get started?

Feta Stuffed Marinated Olives (Gluten-Free, Vegetarian)

I’m all for hearty first courses, don’t get me wrong, but how many holidays have you experienced where everyone fills up on appetizers and then leaves almost no room for the main meal, let alone dessert? When I’ve been cooking all day, I want people to come to the table HUNGRY.  These Feta Stuffed Marinated Olives are just the sort of appetizer I love to serve on Thanksgiving because they’re served at room temperature, they’re simple to make (and you can make them ahead of time!), they pair perfectly with cocktails and are a bite-sized something to nibble on without filling up!

Harvest Bowl Salad with Apple Cider Vinaigrette (Gluten-Free, Vegetarian)

This is one of those salads that is an explosion of flavor in your mouth – one that’s sweet, salty, and tart all at once. The idea of a harvest-themed salad is nothing new, but when you toss one together with the perfect homemade dressing, it is simply chefs kiss. Here I’ve combined fall favorites like apples and sweet potatoes in this delicious meal-in-a-bowl salad and topped it off with a tangy apple cider vinaigrette – think SweetGreen’s Harvest Bowl…. but better (and on your thanksgiving table!)

Hasselback Butternut Squash with Maple Sage Butter, Red Chile + Pumpkin Seeds (Vegan, Gluten-Free)

Thanksgiving is generally a time when we stick to tradition – and I’m all for it! But I want to encourage you to think of classic foods in new (delicious) ways. Butternut squash sides can often be a little bland, but this Hasselback Butternut Squash packs a flavor punch: The maple syrup, butter, sage, and chile add a lot of depth and a bit of crunch to the humble squash! The most intimidating part of making this dish is undoubtedly making the cuts, but I’ve got a little trick up my sleeve to help you make them near perfect every time!

Hashed Brussels Sprouts With Lemon + Poppy Seeds (Vegan, Gluten-Free)

Know someone at your Thanksgiving table doesn’t like Brussels Sprouts? Let’s change their mind! These Brussels are inspired by the famed Union Square Cafe in New York City, and they are SO delicious.  They are sliced thin (I use a mandolin for this) and tossed with lemon, fragrant onion and garlic, and poppy seeds for a unique take on this controversial vegetable.  They are light, bright, and the perfect way to add balance to your thanksgiving spread.

Make Ahead Gravy (Gluten-Free)

The day I found out I could make my Thanksgiving gravy ahead of time was the day my whole holiday life changed.  Where had I been?! For many of us, myself included, making gravy the day of Thanksgiving always felt a bit stressful. This make-ahead gravy requires just five base ingredients:  butter, onion, celery, starch or flour, and stock, and then on the day, while the turkey rests, I simply bring the gravy base to a simmer and add turkey drippings, which deepens and enriches the stock further.  So easy!

Everyday Apple Tart (Gluten-Free)

Whether you are a skilled pie baker or not, we all appreciate a quick and easy recipe that can be thrown together any day of the week. And if you’re like me, you appreciate it a little more when you’re putting together a full thanksgiving menu! This tart is just that: no peeling of the apples, 10 minutes of prep time and a fruit filling technique that takes almost no time at all.

If you add any of these delectable Thanksgiving Essential Recipes to your menu, and I hope you do, please leave me a comment and rate the recipe. Your feedback means a lot to me! You can also post to Instagram and tag me so I can share your creations! 

If you like full recipe videos, you’ll want to follow me on Facebook and Youtube as I publish new videos daily!